Queues
Queues are used for the logical organization of interaction channels and allows for case creation and assignment within the MotionCX platform. Functionality set within Queues will affect how internal and external users interact with case forms associated with an interaction channel. In combination with Routing Profiles and Roles, Queues are assigned to users allowing them access to the case form of specific interaction channels.
To administer queues, navigate to Administration > General Admin > Queues from the left navigation menu.
Add/Edit Queues
To create a new queue, click the Create New Queue button in the top right corner of the Queues page. To edit an existing queue, click the Actions button next to a queue and select Edit.
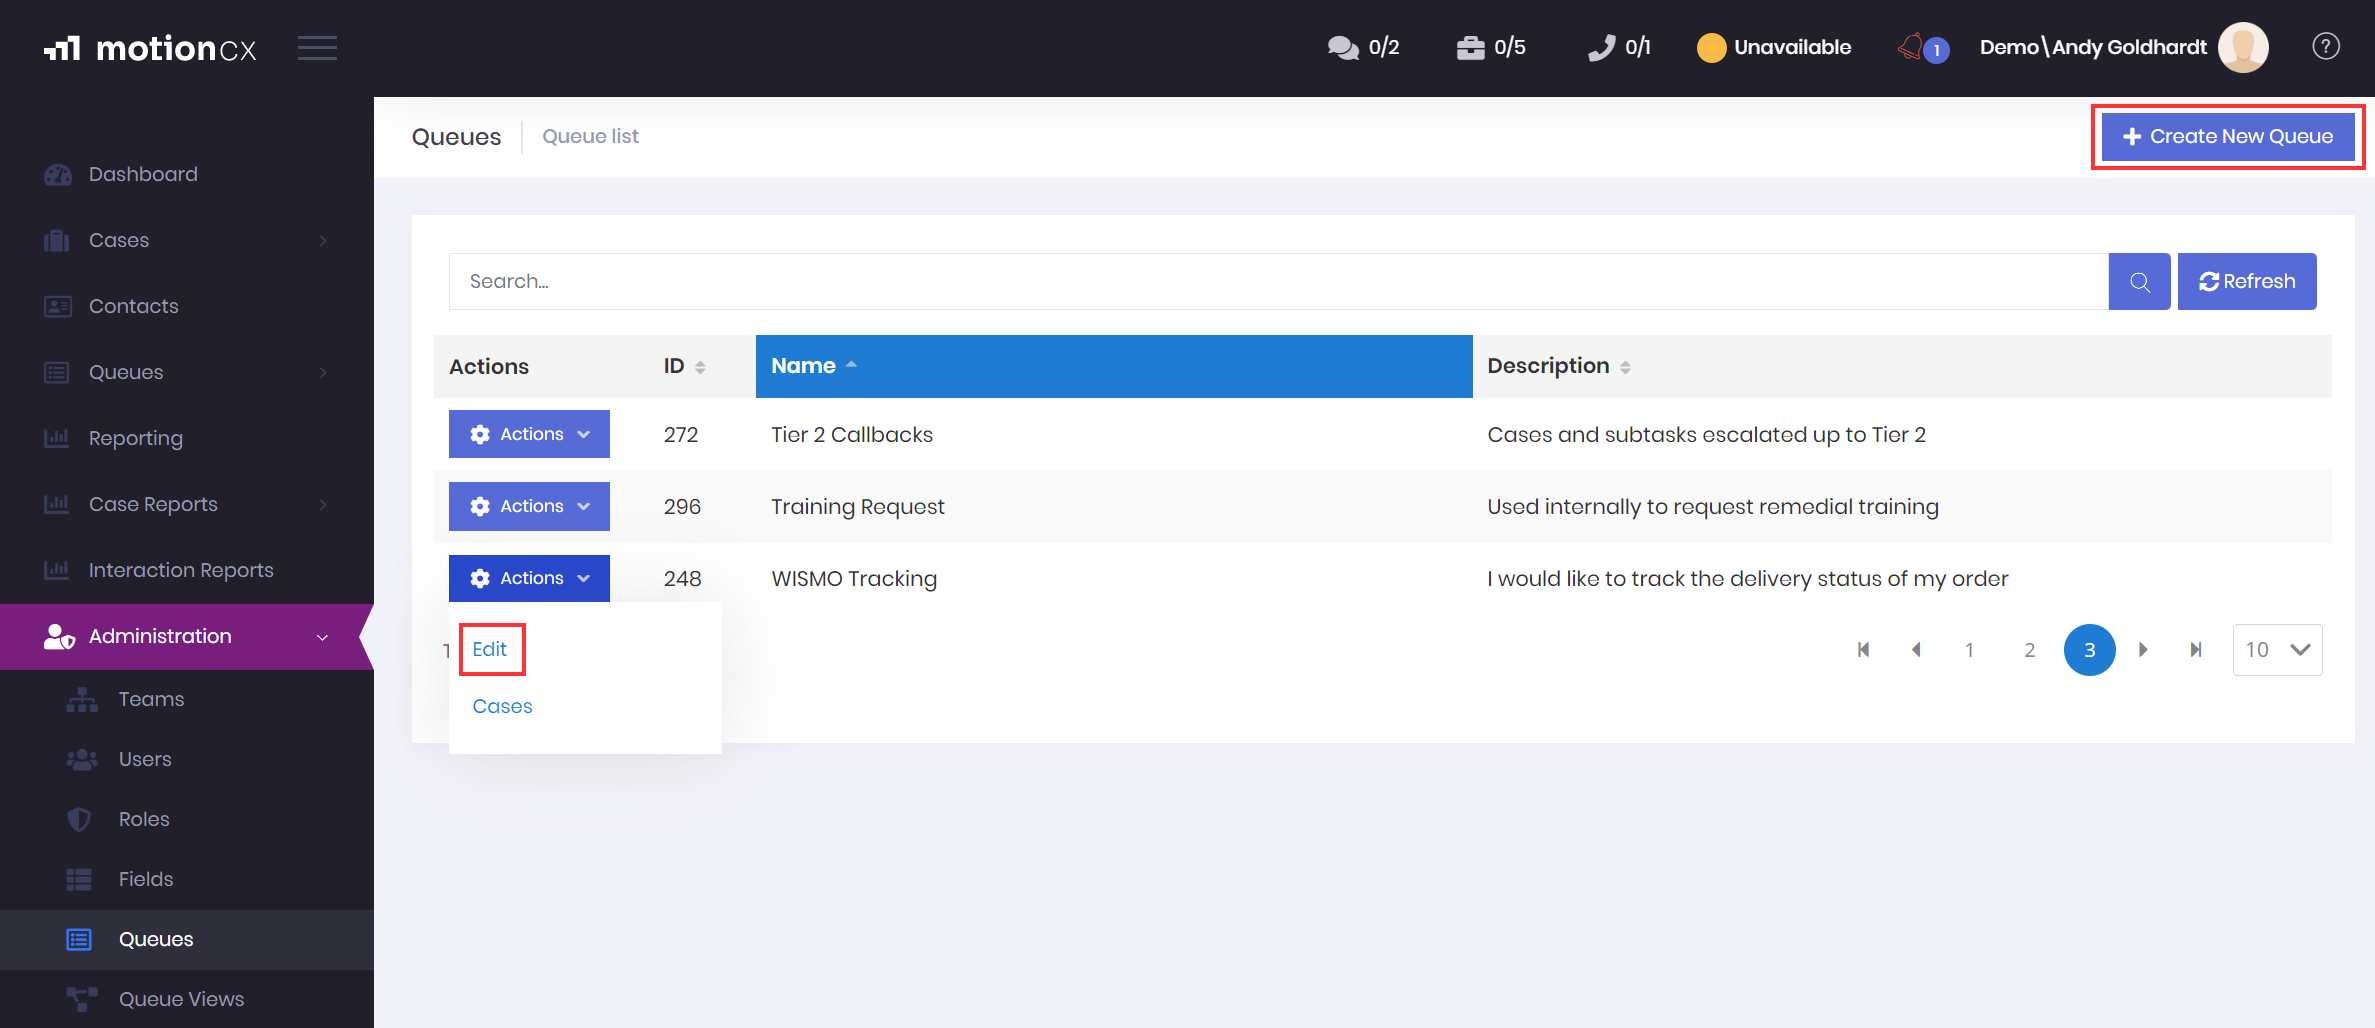
Create/Edit Queue Window
The Create/Edit Queue window consists of four tabs: Queue Information, Channels, Suppress, and Fields.
Add/Edit Queues > Queue Information
The Queue Information tab contains identifying queue information, as well as settings specific to how the case form will behave when creating and editing cases within this queue.
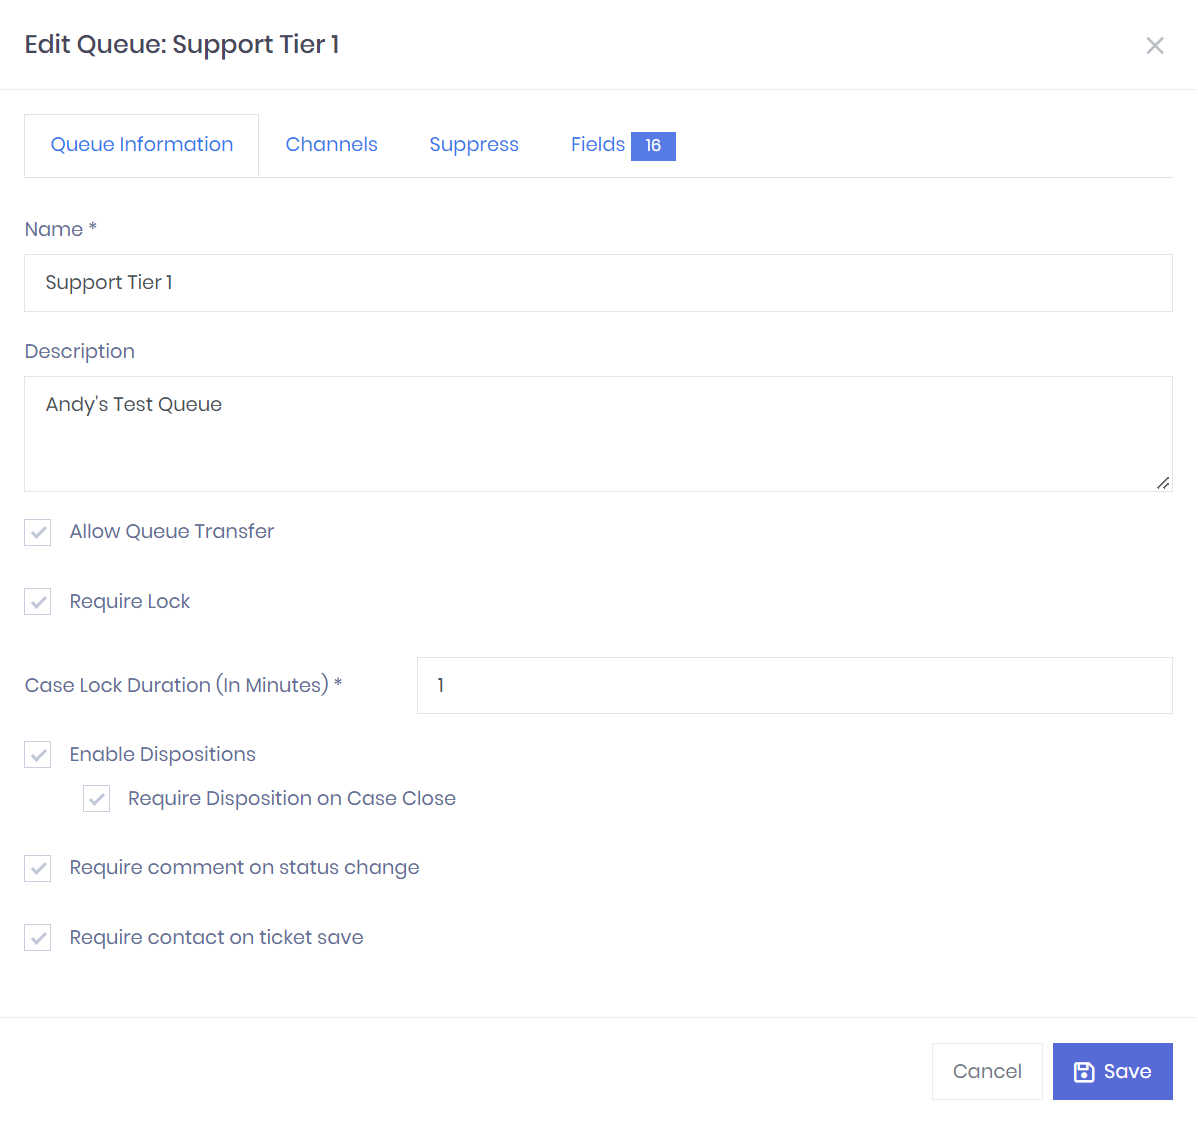
Queue Information Tab
-
Name - A friendly name for the queue that will be displayed throughout the MotionCX platform. The Name field is required for saving a queue.
-
Description - An optional informative description of the queue.
-
Allow Queue Transfer - If checked, cases assigned to this queue can be moved to a different queue by users when editing a case. If un-checked, the queue field will not be editable on the case form.
-
Require Lock - To prevent multiple users from working a case at the same time, a lock can be enabled on the case form. If checked, cases that are viewed within this queue will be locked for editing by the current user. If unchecked, no lock is placed on a case within this queue when viewing.
- Case Lock Duration - When Require Lock is enabled, a Case Lock Duration is required. This is the time, in minutes, that the case will remain locked from initial creation or editing of the case. Once the case lock duration is met, the case automatically unlocks and can be edited by other users.
Unlock All Cases PermissionUsers can be granted the Unlock All Cases permission for the ability to override the lock duration and manually unlock a case.
-
Enable Dispositions - If checked, the case form will allow the user to select a Disposition. If unchecked, the disposition field will not be displayed on the case form
- Require Disposition On Case Close - If checked, the case form will require a disposition to be set prior to the case being closed. If unchecked, the disposition field will be available, but not required on close.
-
Require Comment On Status Change - If checked, when the status of a case is changed the case form will require the user to enter a comment prior to saving. If unchecked, no comment is required on a case status change.
-
Require Contact On Ticket Save - If checked, the case form will require a contact to be selected prior to saving the case. If unchecked, adding a contact to a case will be optional.
Add/Edit Queues > Channels
The Channels tab allows for the configuration of settings for specific interaction channels related to the queue. These configurations determine the internal and external behaviors in relation to each channel type.
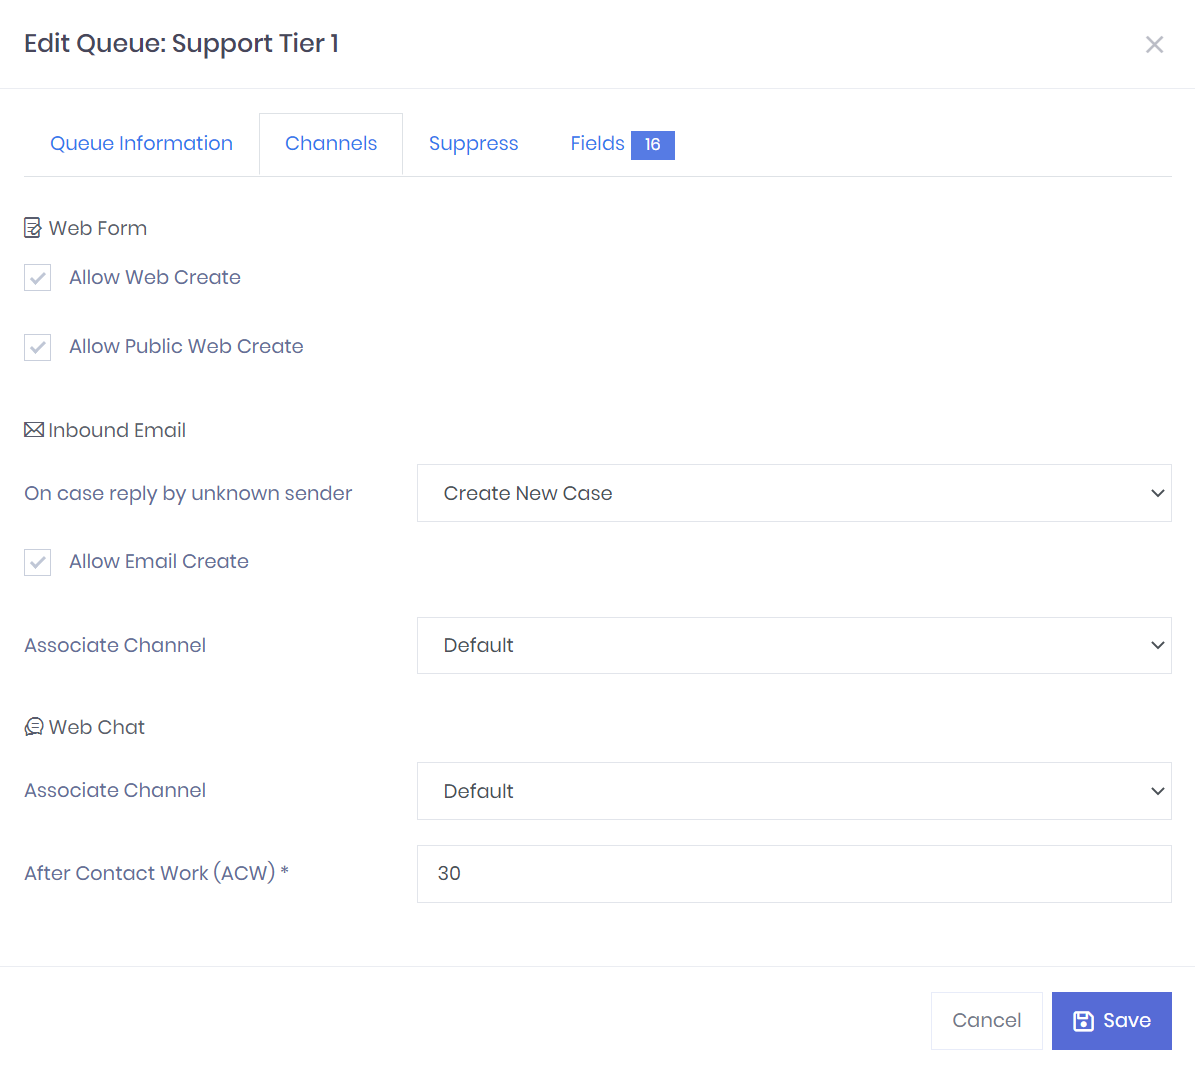
Queue Channels Tab
Web Form
-
Allow Web Create - If checked, users will be able to select this queue as an option when creating new cases manually. If unchecked, this queue may still be used for automatic case creation, but not an available option when manually creating cases.
-
Allow Public Web Create - If checked, the queue will be available as an option on configured Support Portals when creating a ticket. If unchecked, this queue will not be available as an option on support portals.
Public Queue NameIf Allow Public Web Create is enabled, the queue's Description will be displayed in the support portal dropdown. This allows the queue's Name to be used for internal purposes, while Description can be used for a friendly external facing name.
Inbound Email
-
On Case Reply By Unknown Sender - When an email is received for an existing case but the sender is not a participant on the case, the action selected in this dropdown will be applied to the incoming email.
- Deny Comment - The email will not be added as a comment on the referenced case, nor will a new case be created. The email is ignored.
- Allow Comment - The email will be added as a comment on the referenced case.
- Create New Case - A new case will be created, completely separate from the original referenced case.
-
Allow Email Create - If checked, a new case will be created for every incoming email that does not reference an existing case. If unchecked, incoming emails that do not reference an existing case will be ignored.
-
Associate Email Channel - This field has been deprecated and is no longer used.
Web Chat
- Associate Channel - This field has been deprecated and is no longer used.
After Contact Work (ACW) - The amount of time in seconds that a user will remain in the ACW status after an interaction within this queue has completed. While in the ACW status, the user will be unavailable to received incoming interactions no matter of the incoming queue. After ACW time has been met, the user will automatically be returned to the Available status. If ACW is set to 0, then users will be set to Available as soon as an interaction completes.
Add/Edit Queues > Suppress
When certain actions occur on a case, notification emails are sent to all users who are participants of that case. The Suppress tab allows for the control of those notification emails in relation to the queue.
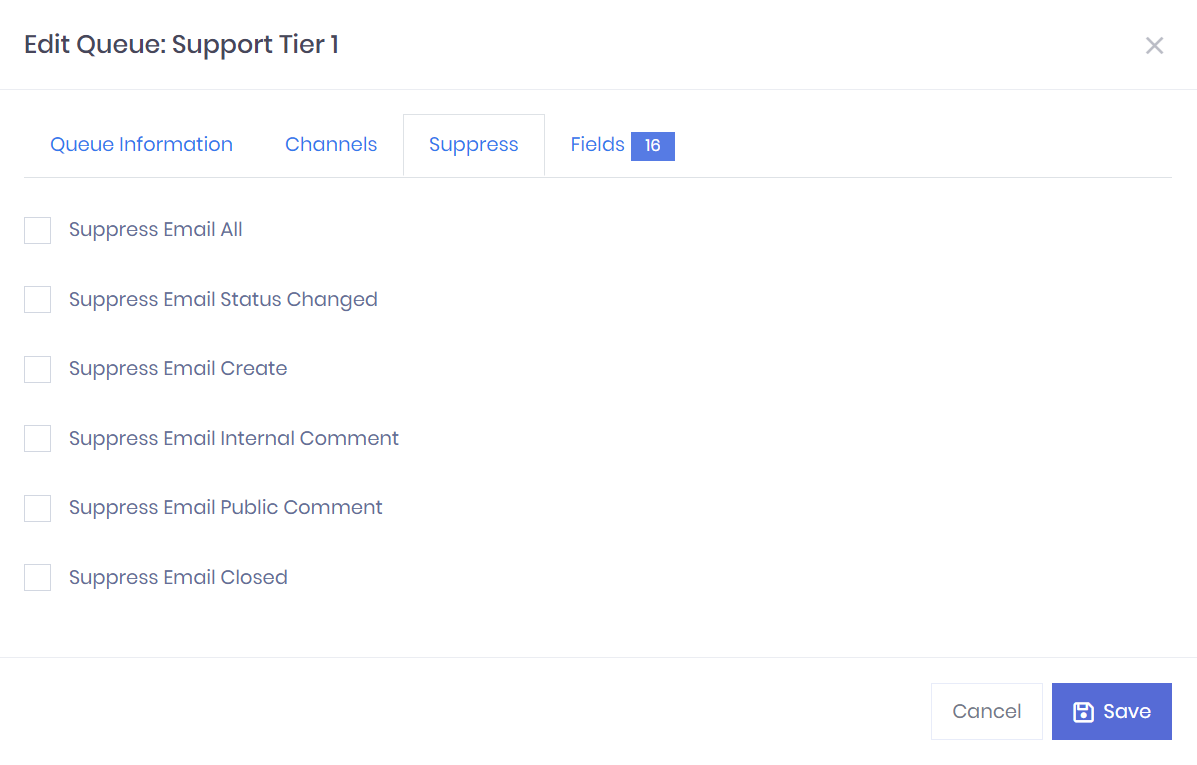
Queue Suppress Tab
-
Suppress Email All - If checked, no notification emails for the queue will be sent. The suppress options below will be enabled by default and become un-editable. If un-checked, notifications will be sent for all queue actions unless suppressed specifically with the options below.
-
Suppress Email Status Changed - If checked, notification emails will not be sent when the status field of a case is changed. If un-checked, notification emails will be sent on status change.
-
Suppress Email Create - If checked, notification emails will not be sent on the creation of a case. If un-checked, notification emails will be sent on case creation.
-
Suppress Email Internal Comment - If checked, notification emails will not be sent when another internal user comments on a case. If un-checked, notification emails will be sent when a comment is made by an internal user.
-
Suppress Email Public Comment - If checked, notification emails will not be sent when a response from an external user is received on a case. If un-checked, notification emails will be sent when a response from an external user is received on a case.
-
Suppress Email Closed - If checked, notification emails will not be sent when a case is closed. If un-checked, users will receive emails on case close.
User NotificationsBy default, users will not receive email notifications when they initiate a change on a case in which they are a participant. Notifications will be sent when other users (internal or external) make a change.
Add/Edit Queues > Fields
The Fields tab allows the association of custom fields to the queue, as well as the order in which they will display on the case form.
Add Fields
To add a custom field to the queue case form, click the Add New Field button. Select the field that you wish to add to the queue. If Required is checked, the field will be required when saving the case form. Click the Save button to finish adding the field to the queue. If a field is added that contains conditional values, those field values will be displayed on the fields list along with the parent field.
Remove Fields
To remove a field from the queue case form, click the X button next to the field. Removing a field from the queue does not delete the field or remove it from other assigned queues.
Edit Fields
Clicking the Gear button next to a field allows for editing a field. This functionality works identical to editing fields within the Administration > Case Admin > Fields page. See Fields for more information on editing fields.
Field Display Order
Once fields have been assigned to the queue they can be arranged in the order in which you would like them to display on the case form. To order fields, left click and hold the move icon to the left of the field name, then drag the field to it's desire location and release.
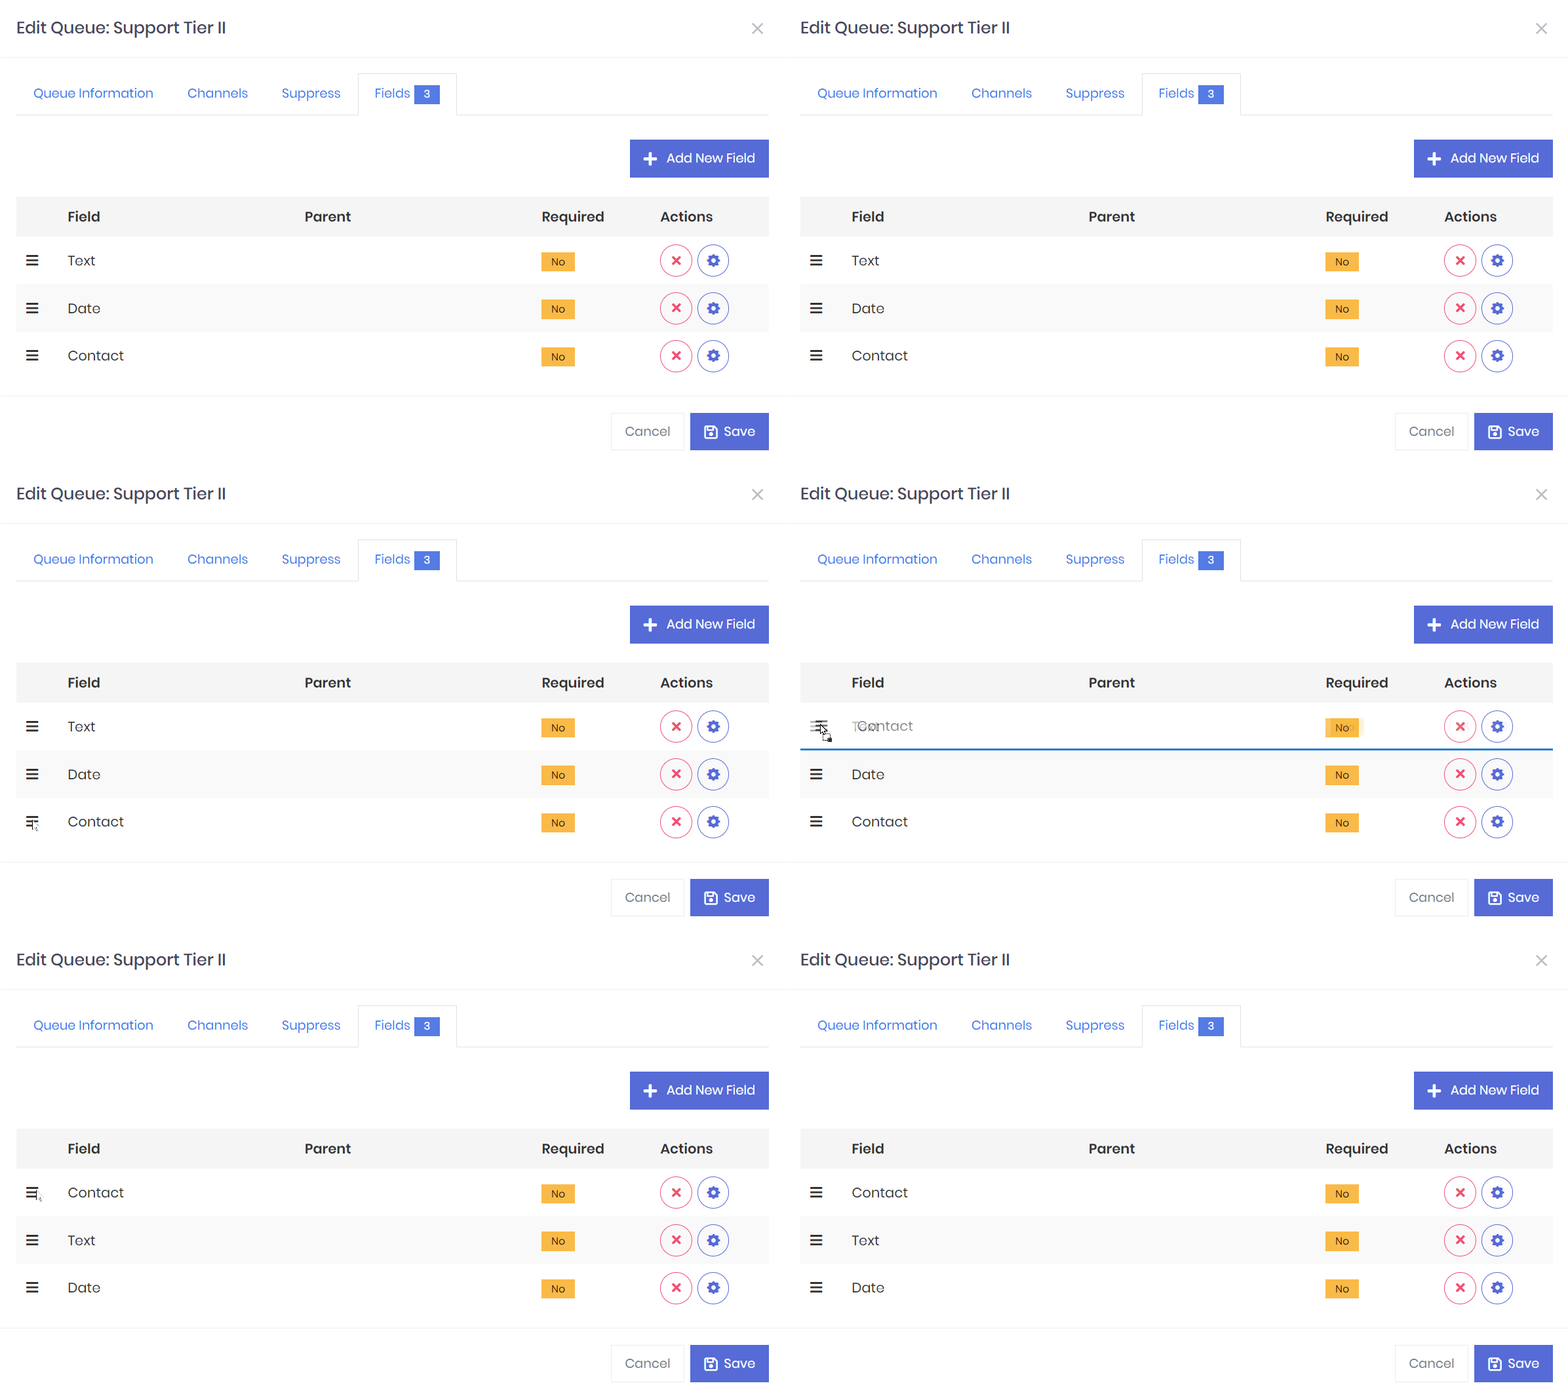
Ordering Fields
Viewing Queue Cases
Cases within a queue can quickly be accessed from the Queues admin page. To view cases, click the Actions button next to a queue and select Cases. You will be navigated to the Cases > All Cases page with the the cases for the selected queue listed.
Updated 8 months ago
