Routing Profiles
Routing Profiles are assigned to users to specify the queues and interaction channels they will be working. Each user can have one routing profile, and will obtain the settings configured within that routing profile.
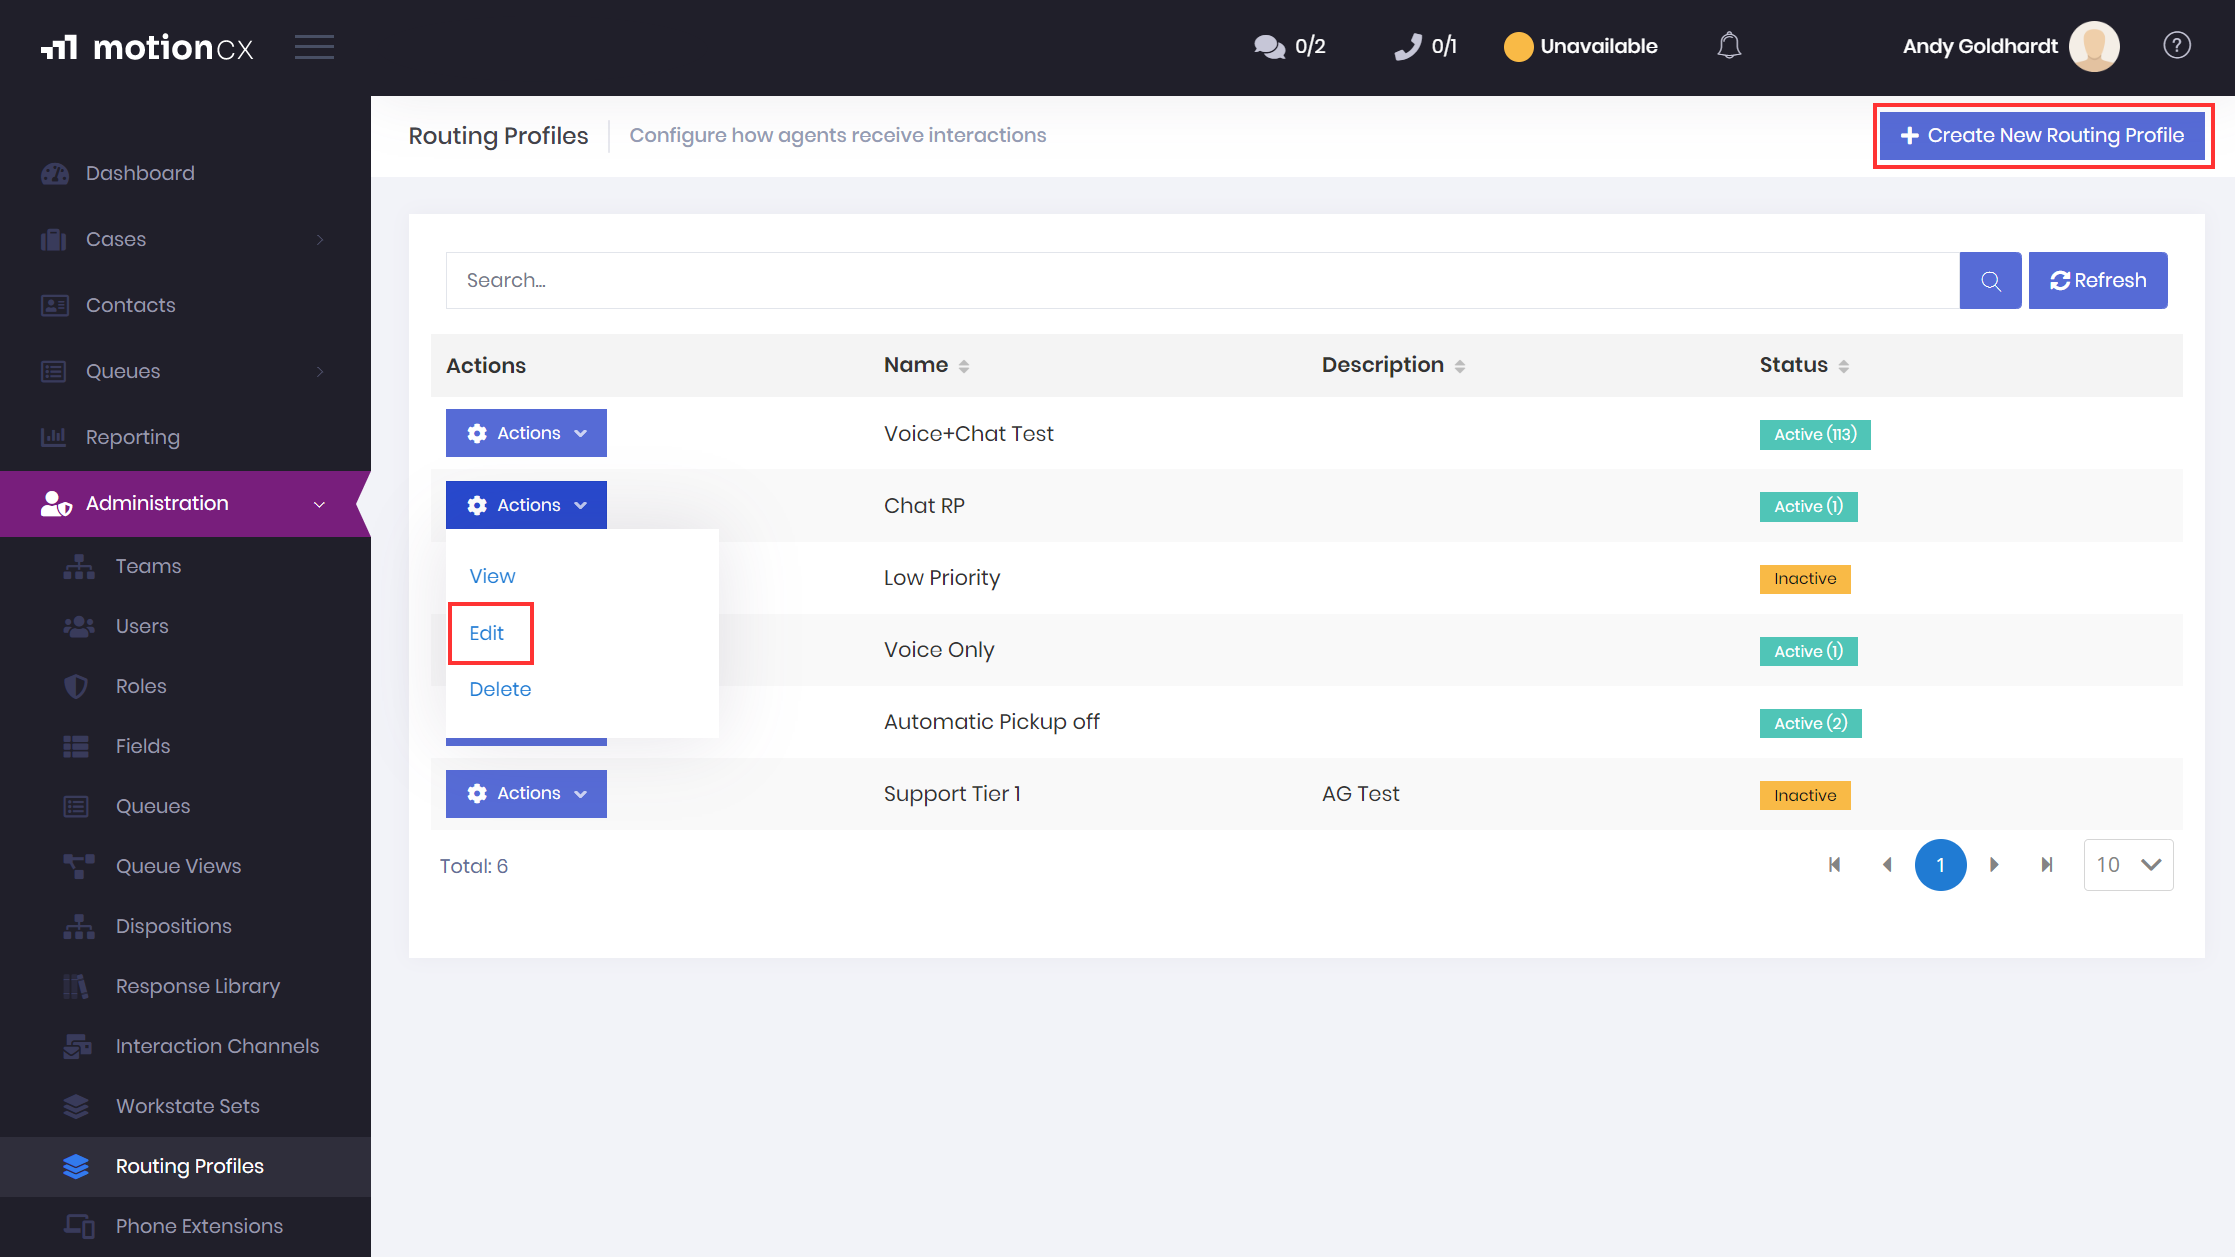
To access the Routing Profiles page, navigate to Administration > Interaction Admin >Routing Profiles from the left navigation menu.
Add/Edit Routing Profiles
To create a new routing profile, click the Create new Routing Profile button in the top right corner of the Routing Profiles page. To edit an existing routing profiles, click the Actions button next to the routing profile, and select Edit.

Add/Edit Routing Profiles
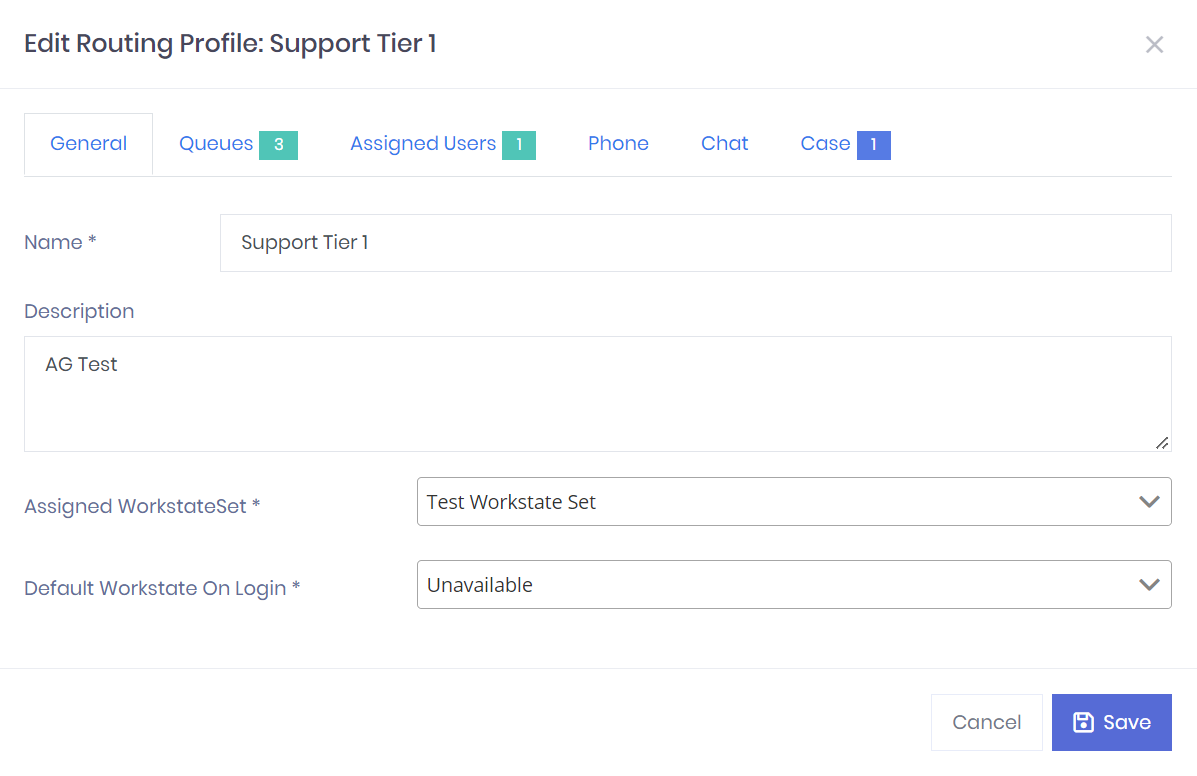
The Add/Edit Routing Profile window will consist of up to six tabs, depending on the type of interaction channels added within the Queues tab. Tabs: General, Queues, Assigned Users, Phone, Chat, Case

Add/Edit Routing Profile Window
Add/Edit Routing Profiles > General
The General tab is where identifying routing profile information and workstate characteristics are set. Name, Assigned Workstate Set, and Default Workstate On Login fields are required.
-
Name - A friendly name for the routing profile that will be displayed throughout the MotionCX platform.
-
Description - An option description for the routing profile.
-
Assigned Workstate Set - The Assigned Workstate Set is the set of workstates that will be available to the users assigned to this routing profile. See Workstate Sets for more information on Workstate configuration.
-
Default Workstate On Logon - Once the Assigned Workstate Set is selected, the Default Workstate On Logon can be selected. When a user first logs in to the web portal or agent application, this will be their initial workstate.
Add/Edit Routing Profiles > Queues
Assigning a queue to a routing profile allows the users assigned to the routing profile access to the case queue and interactions associated with that queue. Multiple queues can be assigned to a routing profile, and queues can be prioritized to allow for priority based routing.
-
Add/Edit Queue - To add a queue, click the Add New Queue button. To edit an existing assigned queue, click the Gear button next to the queue.
-
Queue - Select the queue from the dropdown that you would like to assign to the routing profile.
-
Channel - Select the type of interaction channel that will be associated with the selected queue. Options will be Web Chat, Case, and Phone. Selecting either Web Chat or Case will enabled their respective tabs on the Routing Profile edit window. These tabs will allow for additional configuration related to these interaction channels.
-
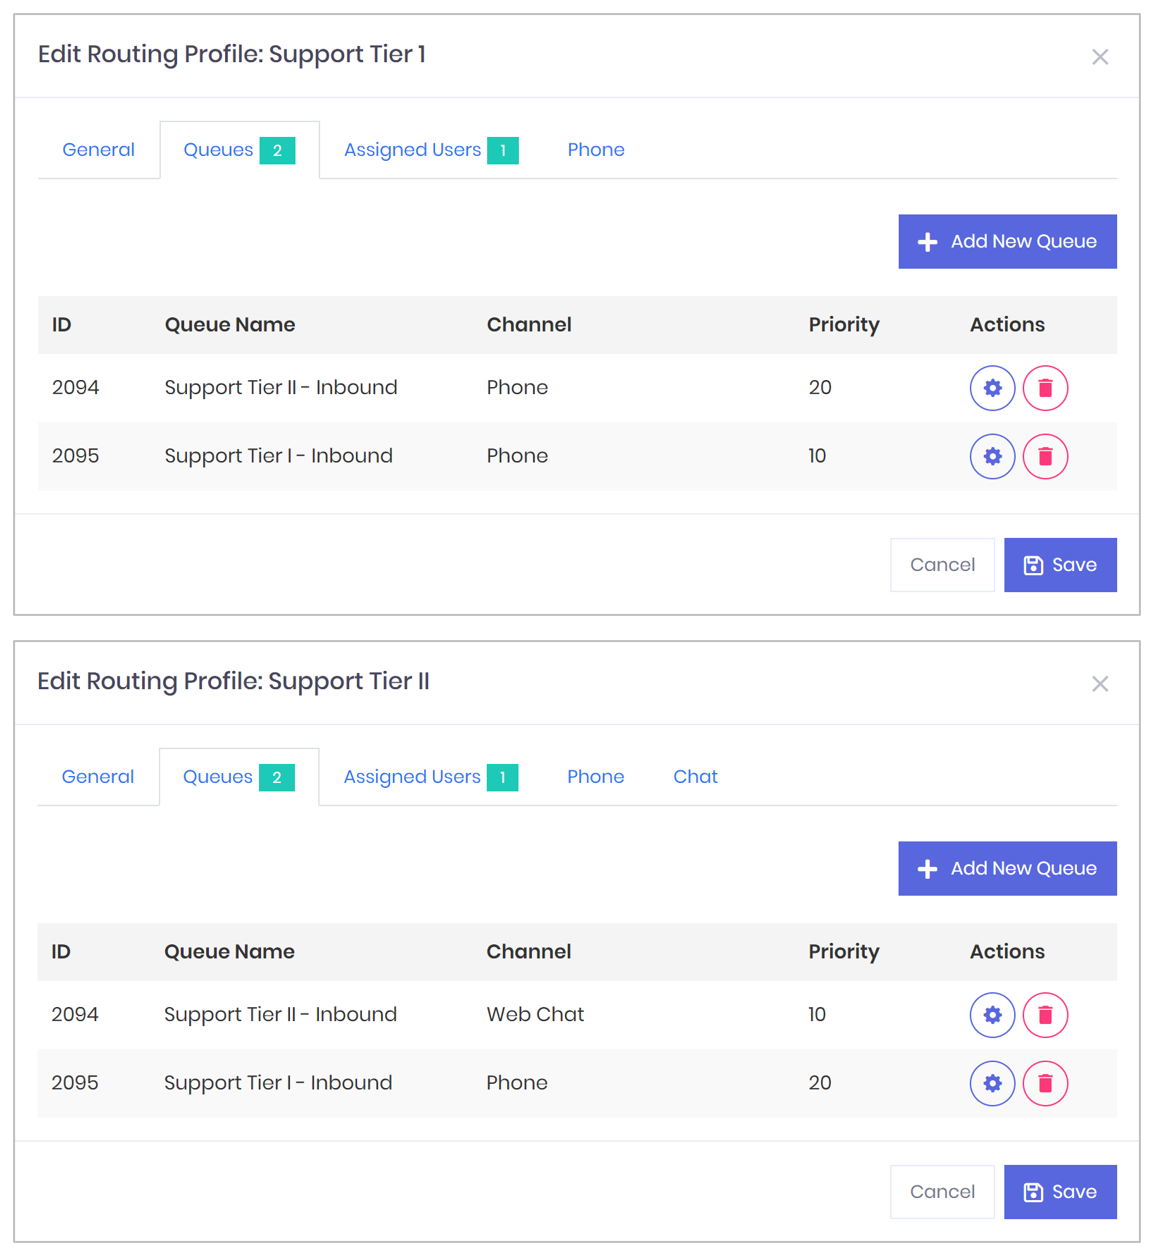
Priority - The priority assigned to queues determine the order in which interactions will be delivered to users of the routing profile. The smaller the priority value, the higher the queue priority. Users will always receive interactions for their higher priority queues until those queues are empty, then they will receive interactions for lower priority queues. The priority is observed by the system for not only queues within a routing profile, but as well as for priorities of queues across multiple routing profiles. See the example below.
-
| Priority Based Routing Example |
|---|
| In the example image below, user A is assigned to the Support Tier I routing profile, while user B is assigned to the Support Tier II routing profile. If an interaction is received through the Support Tier I queue, the interaction will first be routed to user A as their priority for Support Tier I interactions are higher than that of user B. If user A is unavailable, then the interaction will be routed to user B. If bother users are unavailable, the interaction will remain in queue until one of them become available. |

Priority Based Routing Example
Queue Priority Numbering TipWhen setting the priority value of your queues, it's helpful to initially space out the values, i.e. 10, 20, 30. If needed, this will allow you to add queues in between at a later time without having to re-number all of your existing queues in a routing profile, i.e. 10, 15, 20, 25, 30.
- Remove Queue
To remove a queue from the routing profile, click the Delete icon next to the Queue name.
Add/Edit Routing Profiles > Assigned Users
Users can be assigned to a routing profile either through the Users Administration page or directly on the routing profiles page. Adding users via the routing profile page provides the ability to assign the routing profile to more than one user at a time. Routing profiles that have no assigned users will be marked as Inactive on the routing profiles list.
Adding Users To New Routing ProfilesIf creating a new routing profile, the profile must first be saved before users can be added.
-
Add Users - To add users to the routing profile, click the Add Users button.
- Add Users Screen - On the Add Users screen you have the ability to add one or more users at a time by checking the users that you would like to add. If a user is already assigned to a routing profile and they are added from this screen, the user will be re-assigned to this routing profile. To help reduce accidental re-assignment, the user list displays the routing profile that a users is currently assigned to.
-
Remove Users - To remove a user from a routing profile, click the Delete icon next to the users' name. Removing a user from a routing profile will prevent them from handling interactions.
Add/Edit Routing Profiles > Phone
The Phone tab contains settings related to how users assigned to this routing profile will interact with with queues containing phone interaction channels.
-
Automatic Pickup - If checked, the users' MotionCX Agent application will automatically connect to incoming calls when their workstate is set to Available. If unchecked, an Available user has the ability to answer or decline a call. If declined, the call will be offered to the next Available user.
-
Out of Service After Offered Timeout - This setting is used when Automatic Pickup is disabled. If the user does not answer the call within the number of seconds configured for the offered timeout, the users workstate will be automatically set to Out of Service.
-
Offered Timeout - This setting is used when Automatic Pickup is disabled. If the user does not answer a call within the number of seconds configured for the offered timeout, the call will be queued to the next Available user. The user will receive ACW, if configured, and then returned to their previous workstate.
-
Screen Recording - If enabled, users within this routing profile that are using the MotionCX Agent application will have their screen recorded during active phone interactions. Screen recordings will automatically be attached to the Case Files of the associated case when the call completes.
-
Web Portal Case Pop - If checked, when an inbound call is received for a user, the user will be navigated to the All Cases page in the MotionCX web portal and the case will be displayed in a new tab.
-
Display New Cases In Background - This setting is available when Web Portal Case Pop is enabled and affects the behavior of the All Cases page when an inbound call is received. If checked, the user will remain on the case tab they are currently viewing and the new case will appear as a new tab. When unchecked, the user will be automatically taken to the tab of the new case when a call is received.
-
Agent Application Case Pop - If checked, when an inbound call is received the case related to the call will be automatically displayed within the users MotionCX Agent application. If unchecked, the case related to the call will not be displayed within the users MotionCX Agent application.
-
Allow Calls To User Specified PSTN Numbers - If checked, users will be able to enter a phone number for the Landline/Mobile phone type setting within the MotionCX Agent application. Leaving this option unchecked will hide and prevent use of the Landline/Mobile phone type. See Phone Types for more information.
-
Allow Call Parking - If checked, users will be able to use the Parked Calls functionality within the MotionCX Agent application. If unchecked, Parked Calls functionality will be hidden.
Add/Edit Routing Profiles > Chat
-
Concurrent Session Limit - This value sets the number of chat interactions that a user can have active at one time. Chat interactions will be delivered to a user until this number it met.
-
Automatic Pickup - If checked, the user will automatically be connected to incoming chat interactions when their workstate is set to Available. If unchecked, an Available user has the ability to answer or decline chat interactions. If declined, the chat interaction will be offered to the next Available user.
-
Screen Recording - Reserved for future functionality.
-
Offered Timeout - This setting is used when Automatic Pickup is disabled. If the user does not accept the chat interaction within the number of seconds configured for the offered timeout, the chat interaction will be offered to the next Available user.
-
Display New Cases In Background - This setting affects the behavior of the All Cases page when a new chat interaction is received. If checked, the user will remain on the case tab they are currently viewing and the new case will appear as a new tab. When unchecked, the user will be automatically taken to the tab of the new case when a new chat interaction begins.
-
Play Sound On New Message - If checked, a notification sound will be played through the users audio device every time a chat message is received. If unchecked, no audible notification is played when a chat message is received.
-
Show Desktop Notifications On New Message - If checked, a notification window containing the newest received message will display on the users desktop. If unchecked, no desktop notification will be displayed.
Browser Notification SettingsDesktop notifications are dependent on the settings of the users web browser. If Show Desktop Notifications On New Message is enabled on the users routing profile but the user is not receiving desktop notifications, check the settings of their web browser and allow notifications from the MotionCX web portal.
Add/Edit Routing Profiles > Case
-
Screen Recording - Reserved for future functionality.
-
Concurrent Session Limit - This value sets the number of case interactions that a user can have active at one time. Cases interactions will be delivered to a user until this number it met.
-
Offered Timeout - This setting is used when Automatic Pickup is disabled. If the user does not accept the chat interaction within the number of seconds configured for the offered timeout, the chat interaction will be offered to the next Available user.
-
Case Sorting Method - Determines the order in which cases are ordered within the case queue. The dropdown list contains two options for sorting:
-
Last Modified At - Sorting will be based on when a case was last modified, with the case having the oldest modification being ordered first in queue.
-
Created At - Sorting will be based on when a case was initially created, with the oldest created case being ordered first in queue, no matter of when the case had been modified last.
-
-
Case Status On Assignment - When a case from the queue is initially assigned, the status selected from this dropdown will automatically be set on the case.
-
Override Case Assignment - If checked, if a previously assigned case comes into the queue and the original assignee is not available for additional cases, the case will be re-assigned to the next available user. If unchecked, the case will remain in the queue until the original assignee becomes available.
-
Display New Cases In Background - This setting affects the behavior of the All Cases page when an incoming case interaction is received. If checked, the user will remain on the case tab they are currently viewing and the incoming case interaction will appear as a new tab. When unchecked, the user will be automatically taken to the tab of the case when a case interaction begins.
Add/Edit Routing Profiles > Case > Status Mapping
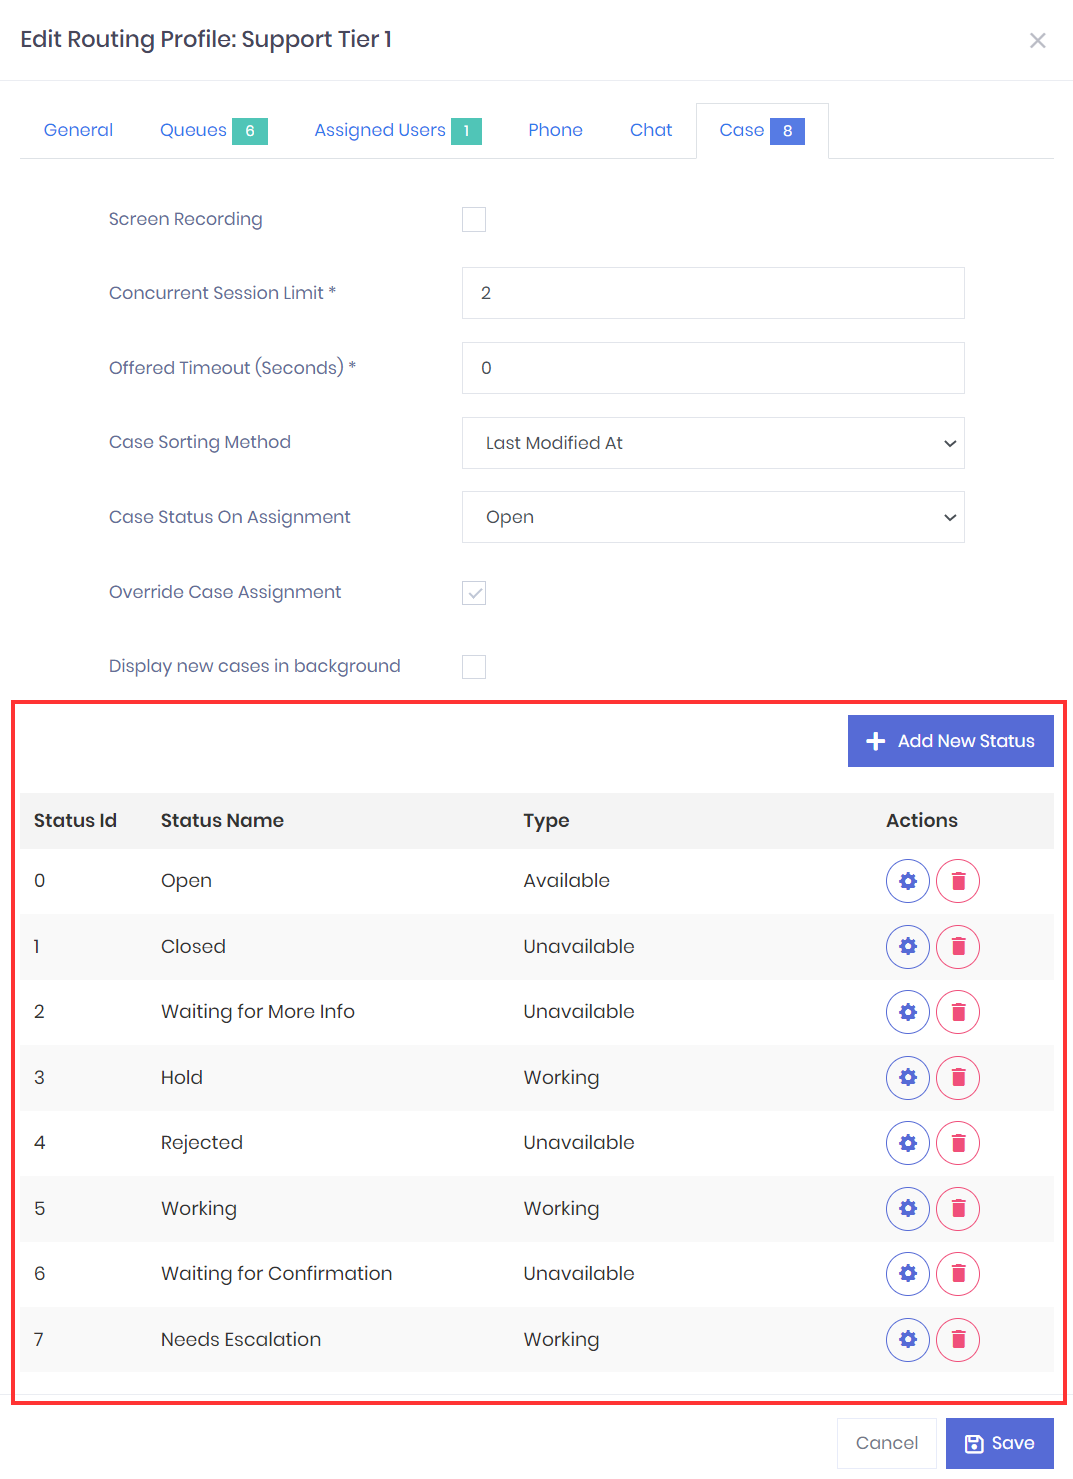
Status mapping allows for all Case Statuses to be related to an interaction state. As case statuses are changed throughout the MotionCX platform, these interactions states will be applied and trigger the following actions:
-
Available - The type of Available queues the case as an interaction available for working.
-
Unavailable - Cases with an Unavailable type are not treated as a queued or active interaction.
-
Working - The type of Working indicates that a case is an active interaction and will count towards the the assigned users Concurrent Session Limit.
Add/Edit Status - To add a status for mapping, click the Add New Status button. To edit an existing status, click the Gear icon next to an existing mapping. On the Add/Edit Status window select the desired case Status then select the Type to map to the status. Cases statuses can only be mapped once and will not display in the Status dropdown if already mapped.
Remove Status - To remove an existing status mapping, click the Delete icon next to an existing mapping.

Case Status Mapping
Unmapped Cases StatusIf a case status is not mapped to an interaction state the system will treat the case status as an Unavailable type. It is recommended to map all cases statuses.
Save Routing Profiles
When saving routing profiles, Name, Assigned Workstate Set, and Default Workstate On Login fields on the General tab are required, as well as at least one queue assigned on the Queues tab.
To save a routing profile, click the Save button on the Add/Edit Routing Profile window.
Delete Routing Profiles
Only inactive routing profiles, ones that are not assigned to a user, can be deleted. If a routing profile is not assigned to a user it will be indicated as Inactive in the routing profiles list.
To delete an inactive routing profile, click the Actions button and click Delete.
Updated 7 months ago
